For the complete documentation index, see llms.txt. Markdown versions of documentation pages are available by appending
.mdto page URLs; this page is available as Markdown.
Manage Clients
Maintaining Client's Database for all the clients of a financial institution is one of the important aspects of any financial institution. This client's database includes:
- Client's Personal Information (Name, Date of Birth, Client Activation Date. etc)
- Client's Loan Portfolio (All the loans that a particular client has, including the statuses of those loans, Repayment schedules, transactions, etc)
- Client's Savings Portfolio
- Client's additional details
- The documents submitted by the client.
- Assigned Staff.
Beginning at the main screen, select Clients click on Clients from the drop-down menu. This will launch the Clients page.
Create Client 
- Click on "Clients" tab on top left, next to Spade icon on the home page. It opens a new page containing a list of all the clients.
- Click on
 tab on top the right corner, the page shown below opens. \
NOTE: While filing the form, note that fields with an asterisk(*) are Mandatory.
tab on top the right corner, the page shown below opens. \
NOTE: While filing the form, note that fields with an asterisk(*) are Mandatory.
Selecting Legal Form as PERSON 
If you are creating legal form for a person, then select Legal Form: as PERSON.
Then continue providing other required fields.
| Field name (attribute) | Description |
|---|---|
| Office (Mandatory field) | Select the office to which person should be associated. |
| Legal Form | Select Person, by default if nothing is selected it will create as person. |
| First Name (Mandatory Field) | Provide Person's First Name |
| Last Name (Mandatory Field) | Provide Person's Last Name |
| Mobile Number | Enter the Person's Mobile Number |
| Date of Birth | Enter the Person's Date of Birth using Date Picker |
| Client Type | You can define your own set of type in - Manage Codes, then select those defined drop-downs like child, senior citizen,etc. |
| External Id | Provide any reference unique ID. For exaample: Person's application sheet number or branch code+person's id number, etc. |
| Client Classification | You can define your own set of classification in - Manage Codes, then select those defined drop-downs like individual, married, widow, etc.. |
| Staff | You need to have defined - https://mifosforge.jira.com/wiki/display/docs/Manage+Employees, wherein you can select the staff from drop-down and associate. |
| Gender | You need to have defined Gender in - Manage Codes, then Use the drop-down menu to select the gender of person. |
| Active | By checking the check box will enable client activation at this level, You can provide activation date for field - Activation Date. |
| Submitted On (Mandatory Field) | Provide application submission date. |
| Open Saving Account | Check this, to create the savings account for the client while client is being created. After checking this, one more field will appear, "select saving account", in order to select the savings product. |
Then Click on Submit button.
Selecting Legal Form as ENTITY
If you are creating legal form for ENTITY, then select Legal Form: as ENTITY.
| Field name (attribute) | Description |
|---|---|
| Office (Mandatory Field) | Select the office to which Entity should be associated. |
| Legal Form | Select Entity |
| Name (Mandatory Field) | Provide Entity's Name |
| Mobile Number | Enter the Entity's Mobile Number |
| Incorporation Date | Enter the Entity's Incorporation Date using Date Picker |
| Incorporation Validity date | Enter the Entity's Incorporation validity Date using Date Picker |
| Client Type | You can define your own set of type in - Manage Codes, then select those defined drop-downs. |
| External Id | Provide any reference unique ID. For example: Person's application sheet number or branch code+person's id number, etc. |
| Client Classification | You can define your own set of classification in - Manage Codes, then select those defined drop-downs. |
| Incorporation Number | Provide Incorporation number |
| Main Business Line | You can define Main Business line in - Manage Codes, then select those defined drop-downs. |
| Constitution (Mandatory Field) | You can define Constitution in - Manage Codes, then select those defined drop-downs like pvt ltd, public ltd,etc. |
| Remarks | Provide remarks, if any. |
| Submitted on (Mandatory Field) | Provide application submission date. |
| Active | By checking the check box it enables client activation at this level, You can provide activation date for field - Activation Date. |
| Open Saving Account | Check this, to create the savings account for the client while client is being created. After checking this, one more field will appear, "select saving account", in order to select the savings product. |
You then have to fill in some personal information about your family in as seen in the image below:
The person or entity should select a family member who can be contacted in case the client is not available and provide details about him or her.
The information below is related to the family member
| Field name (attribute) | Description |
|---|---|
| Relationship (Mandatory Field) | The relationship between the entity and the family member |
| First name | The first name of the family member |
| Middle name | The middle name of the family member |
| Last name | The last name of the family member |
| Qualification | The qualifications of the specified family member |
| Mobile Number | His or her mobile number |
| Age | The age of the family member |
| Is Dependent? | Checking the check box shows that the family member is independent |
| Gender | The gender of the person. You can choose from the drop down that appears when you click on the side button |
| Profession | The profession of the family member |
| Marital Status | You can choose from the drop down the marital status of the person |
| Date of Birth | The birth date of the person. |
You also have to fill in some information in the table below:
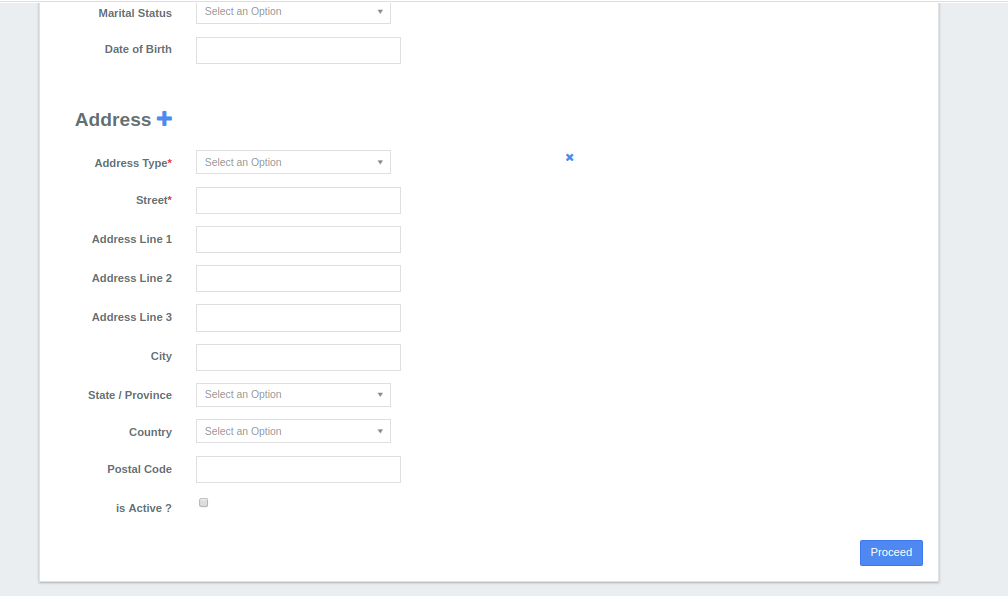
For the image above, you need to fill in details about your address, street, state/province, country and postal code.
{% hint style="info" %} NOTE: All fields with asterisks are mandatory fields. {% endhint %}
You can now click on Proceed.
Then Click on Submit button.
Import Client 
select "Import Client" at the top right of the clients page
Once you select "Import Clients", the following page will be shown:
- You can select the office, staff and legal form from their respective drop-downs as shown on the screenshot above and download a client template where you will fill in the clients and all the information concerning them.
- You can also upload and excel file of the client and information from your computer.
- In the screenshot below, we have a table containing the client documents that have been uploaded to the system.
Activate a client
If Client is not activated, while creation then follow these steps:
- In the list of Clients, select the client and click on Activate button as shown in the image below.
2. Refer the image below and enter the activation date and click on submit button to activate the client.
Edit an existing client
In order to edit the Client,
- Click on Client to view the client
- Then Click on Edit button to see the following window:
3) Enter the details and click on Submit button.
Assign staff to a client
To assign a staff for the client,
- Click on Client to view the client
- Then click on "Assign Staff" tab.
Select the staff from drop-down list
Transfer a client
1. Open the list of clients by clicking on "Clients" tab.\ 2. Click on the client to view his profile\ 3. Click on the "Transfer Client" tab
4. Select the office to where Client is transferred and then click on Confirm button.
5. A new window will open where you have to click on "Accept Transfer" tab to finish the client transfer.
Close a client
Follow these steps in order to Close a Client
- Go to the Client's profile.
- Click on "Close" tab
- A new window will open. Provide "Closure Date" and "Closure Reason".
- Click on "Submit" button to close the Client.
Re-activate client
Follow these steps in order to "Re-activate" a Client
- Go to the Client's profile
- Click on "Re-activate" button.
Related articles
- Page:Manage Centers
- Page:Manage Groups
- Page:Client Relationship Management
- Page:Manage Clients